Medieval floor tiles are made from red coloured, high iron clays and fired to earthenware temperatures. In such a firing the clay has changed so that it will no longer mix with water but the fired clay is still porous (like a flower pot). This occurs at temperatures around 1000 - 1100 degrees centigrade. Fired higher than this and the clay will start to melt and will slump and change shape.
Lead glazes were used to glaze the tiles; these are relatively soft and so have worn off most original tiles where there was any degree of foot fall. Glaze may still be found in recesses in the tile where the indents were not adequately filled with white clay on the sides of tiles and occasionally on the tile wearing surface.
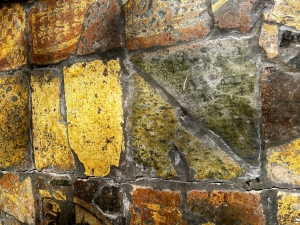
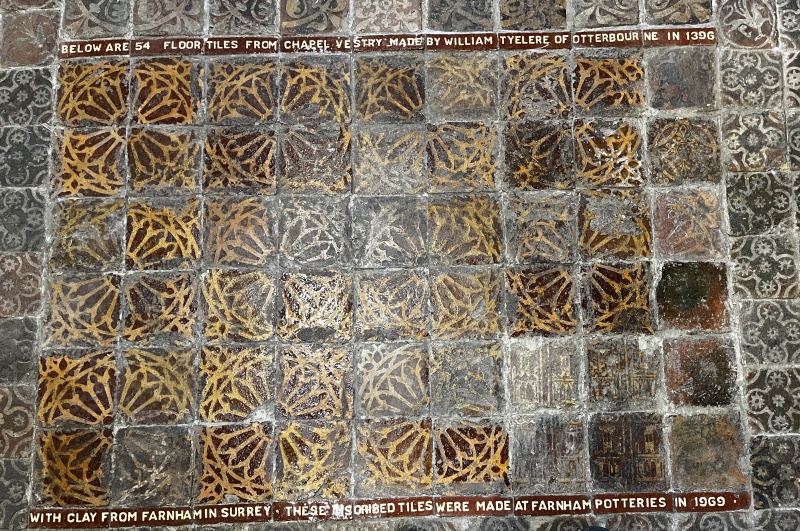
At Winchester college they have a uniquely splendid set of medieval tile pavements. These are generally in ‘private rooms’ and so have received very little wear. Even more exciting is that in 1969 they ‘found’ tiles in their Chapel vestry some of which had never been lain and had received no wear. Of note is now much brighter and bolder the unworn tiles are compared to the surrounding tiles that have been in place since 1396. It is these types of glaze finishes that we need to recreate and not the dull, worn glaze finishes that are more commonly seen.
A simple lead glaze is clear and transparent and will not add any colour over the underlying white clay. Traces of iron were often present in medieval glazes and these give the light brown ‘honey’ colour commonly seen. More iron gives a darker brown and if copper is also added can almost be black. Copper is a complex ingredient in glazes but at earthenware temperatures it gives a range of greens - pale green at 0.5% inclusion of copper oxide through to a stronger green to black at 2.0%.
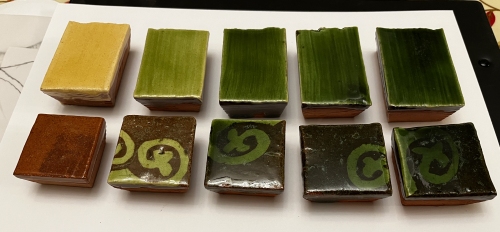
The image below shows a series of test glazes. There are two rows of test tiles, the top row has a white clay slip painted over the red clay, the lower row has a design inlaid into red clay. The glaze contains some iron rich clay (3%) in a lead frit base. From left to right copper was added to the glaze at 0, 0.5, 1.0, 1.5 and 2.0% inclusion.
The top left tile shows the basic cream coloured slip - the small amount of very finely dispersed iron oxide gives the ‘honey’ colour. Adding copper brings in a typical green colour - starting pale and changing to a dark green at 2% inclusion.
The lower row show the interaction of the copper inclusion with the iron in the red clay - as more copper is added the glaze is almost black.
Combinations such as these were used in mosaic tiles and in tiles at Dore Abbey - see picture at top of this post and the post on Project Three.
Medieval potters used simple lead oxide as the base glaze material - most work’s sites for the grand buildings of the thirteenth century would have had extensive lead works as many cathedrals are largely roofed with lead sheeting. Lead waste would have been heated and melted in the open air and stirred to encourage the molten lead to oxidise. This would then need grinding to a fine powder before use. Glazes are usually ground to pass through a 80 to 100 mesh sieve (80 - 100 holes per linear inch) and this would have been a very dusty (and lethal) process.
Glaze for the tiles would have been mixed with water to make a liquid with the consistency of cream - somewhere between single and double cream. Some sources report that organic matter was also added and the sediment (lees) from beer brewing may have been used. This could have had several effects
Reduce settling. Lead is heavy and rapidly sinks in any glaze. The organic components may have slowed the settling or stopped the settled material compacting so much in the bottom of the glaze bucket. However whilst my lead glazes are very quick to settle out they do not form a solid ‘cake’ which is then very difficult to re-suspend. Even after several weeks of settling the glaze mixes up with little effort.
Strengthening the dried glaze. I use a simple powder suspended in water as my glaze and when dry it is very fragile - little more than a powder lying on the clay. It is extremely prone to knocks - just touching two tiles together when loading the kiln chips the glaze and required touching up with new glaze. Did the organic additions help to reduce ‘chipping’? Beer lees are high in proteins - do these act as a very weak glue that adds some strength. A simple glaze of mineral powders in water will keep for a long time - years. Add any organic matter to it and this will start decaying and rotting. This will smell bad and will alter the glaze’s behaviour. If tiles are being made by the thousands this would not be an issue but at my experimental level it would cause problems I do not want to encounter!
Glaze application - brush or dip
Glaze can be applied with a brush - probably a large, wide type. This gives good control of where the glaze goes. This could be important if the tiles are later stacked on edge in the kiln ensuring that glaze covered areas do not touch each other. However it can leave ‘streaks’ and brush marks, it can stir up the underlying, unfired clay and it can take time and repeated coats to build up a thicker layer.

Dipping is quicker, the tile can be held in the glaze for several seconds. This allows water to be absorbed from the glaze into the clay and builds up a thicker layer of glaze. If the tile is held face down and horizontal then part of the side wall can be glazed ensuring the glaze ‘warps around’ the top edge and, once installed, the entire exposed surface is covered in glaze. However if the side walls are glazed it makes stacking the kiln more difficult.
When a tile is dipped it needs to be held firmly. When a tile is 25 - 30 mm thick it is possible to grip the lower parts of the wall, dip down to part way down the side wall and still avoid finger marks etc. From personal experience if the side wall chamfer is too great it starts to become difficult to grip the tile. Dropping an unfired tile in a bucket of glaze destroys the tile and usually ruins the glaze in the bucket.